These dungeons are unlocked in the Expedition section.
So far only the first map, Green Plains, is available for expeditions.
Both dungeons there are the same; it's just a front and back entrance.
They however have each a cooldown of four hours that is not shared with the other; this means you can run the dungeons twice every four hours.
CAUTION:
- If you leave the dungeon through any entrance without finishing it first, it is counted as forfeiting.
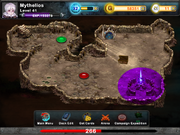
Dungeon Layout[]
Even though the dungeon is the same no matter which entrance you take, you do start in two different locations.
This sections explains the different rooms and their contents.
Dungeon Entrance (not accessible from Rear Entrance)[]

There's not much to say about this room.
There are two enemy nodes and one staircase that leads down to the first fork.
First Fork Room (not accessible from Rear Entrance)[]

This Room features two enemy nodes as well as two staircases further downwards.
The right hand side staircase leads to the Guard Quarters and a chest.
The other one continues deeper into the dungeon.
Guard Quarters (not accessible from Rear Entrance)[]

If you took the right hand staircase, this is where you end up.
This room features only one enemy node with a Mini-Boss: the Tribeling Guard.
Second Fork Room[]


This room features five enemy nodes and two staircases.
The upper staircase leads to the Recuperation room and towards the back entrance.
The lower staircase leads to the Chieftain Chambers and a chest.
Chieftain Chambers[]


This room features two regular enemy nodes.
The marked node is the Tribeling Chieftain Mid-Boss.
The green node is a gnome offering you to refill your hp by 100 in exchange for 1 rune. He is accessible upon defeating the chieftain.
The staircase leads to the Anteroom right before the Boss.
Recuperation Room[]


This room features 3 enemy nodes, a gnome node and two staircases.
The staircase that goes up leads to the rear entrance and towards the Spiral Room.
The staircase that goes down leads to the Anteroom towards the dungeon Boss.
Rear Entrance[]


This room features two enemy nodes and two staircases.
The upper staircase leads to the Recuperation Room.
The lower one leads to the spiral room and a chest.
Spiral Room[]


This room features 2 regular enemy nodes, a gnome node a Mini-Boss and a chest.
The chest in this room drops cards of tier 4 or 5, this chest is the only confirmed method of acquiring Vampiric Axe Skeleton and is the only known way to get more than one Lava Droplette.
The marked node is a Mini-Boss with slightly better cards than the norm.
Anteroom[]


There are 4 enemy nodes in this room and 3 staircases.
The left Staircase leads up to the Chieftain Chambers.
The center one leads down to the Boss Room.
The right hand side staircase leads to the Recuperation Room.
Boss Room[]

The first node in this room is a Gnome Merchant that warns you about the enemy in this room and offers to heal you by 300 health for 5 runes.
The enemy node is the dungeon boss; the Ninja Guardian.
The marked construct is a corruption orb planted by the Blue Witch.
The first time you beat the dungeon you can shatter it (uses 30 endurance).
Do so and you will receive an Elite Tier 7 card: Pan the Apothecary.
Notable Enemies[]
There are 4 notable enemies in this Dungeon.
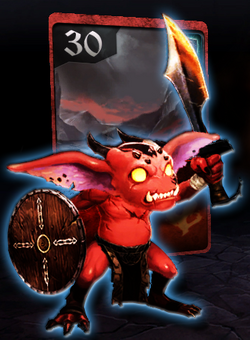
Tribeling Guard[]

This is a kind of Mini-boss that holds his post in the Guard Quarters.
He is Guarding a chest and has cards that are slightly stronger than the average enemies in the Dungeon.
The lowest few floors have enemies of his strength as regular enemies.
Still with his 200 HP he already outranks a lot of the other enemies.
(His deck composition will be completed in time.)
Deck Composition[]
Fire Cards[]
Water Cards[]
Earth Cards[]
Magic Cards[]
Item Cards[]
- Remedy Potion Small Healing Potion
Loot Chest[]
- This Chest sadly only contains one thing, so you'll always get the same; no matter how often you open it:
Tribeling Chieftain[]


This enemy is a Mid-Boss in this dungeon.
He is found in the Chieftain Chambers guarding a chest and a replenishment point.
His 240 HP might not be outstanding for a Mid-Boss but his cards have a way higher power rating compared to the common dungeon enemies.
He features several higher-tier cards and can easily take down an oponent that underestimates him.
Deck Composition[]
Fire Cards[]
Water Cards[]
Earth Cards[]
Magic Cards[]
Item Cards[]
Loot Chest[]
Possble Chieftain loots are (* = rare drop):
- 1 Rune*
Bewitched Wildlife[]


This enemy is another Mid-Boss that can be found guarding the chest in the Spiral Room.
With his 240 HP he ranks in the top tier of this dungeon, but his cards are weaker than those of the Chieftain.
Still, underestimating him wouldn't be wise as he can still deal a fair amount of damage and any damage sustained in a dungeon reduces the chances of completing it.
His ferocity lies less in his monster cards than in his tactical ones.
Deck Composition[]
Fire Cards[]
Water Cards[]
- Werewolf x2
Earth Cards[]
Magic Cards[]
Item Cards[]
Loot Chest[]
This is probably the best chest in this dungeon in regard to monster card drops.
You will get one of the following (* = rare drops):
- 2 Runes*
Ninja Guardian[]


This is it; this is the big boss of this Dungeon.
He has 390 HP and cards that are out of this world compared to the ones that you've seen in this dungeon so far.
RECOMMENDATION:
Puppet Master and Reversals work well to trap him.
Never underestimate him, he is able to do over 200 damage in one turn.
Highest registered damage dealt by him so far in one hit: 361
Deck Composition[]
Fire Cards[]
Water Cards[]
Earth Cards[]
Magic Cards[]
- Confusion x2
Item Cards[]
Loot Chest[]
The chest for completing the dungeon is of course very interesting.
You get 20000 gold, 2 runes and one of the following cards:
Special Loot:[]
If this was your first Playthrough, or you haven't shattered the crystal yet. you may now do so in exchange of 30 Endurance. If you do you will a tier 7 Elite Card (Elite Cards are always tier 7) :